Designing the Wakesurf Style custom board-Part 1 The Graphics
To celebrate the launch of Wakesurf Style we have arranged for Blusurf, a world leader in custom performance wakesurf boards to build a Wakesurf Style themed board for one of the Wakesurf Style team members. Blusurf products utilize the finest sustainable elements and build processes offering riders a performance-based, environmentally conscious board designed and built in Washington State. We worked with Jonathan Matthews – Blusurf’s “Founder and Shaper” throughout the process.
Designing the Wakesurf Style custom board:
- Part I - The Graphics
- Part II – Shaping the Board
- Part III – Fin box, graphics, lamination and finishing
Why a custom wakesurf board?
There are two kinds of specialized boards available for order on the internet, personalized and custom. Personalized is where the manufacturer takes a specific off the shelf model of their board and adds custom graphics. Custom boards are designed and shaped for a specific rider taking into account their body type, boat they ride. riding style and graphics among other factors. We are working with Blusurf and this article covers the creation of a custom board.
What most people do not realize is that a custom board produced specifically for you is around the same price as most higher-end mass-produced wakesurf boards these days. You need to consider that no matter what your perception is, all boards are manufactured for a specific person. So that wakesurf board you bought from your favorite store was designed as a hypothetical example for a rider that is 5’ 8” intermediate rider, weighing 175 lbs who favors their back foot, likes to cruise and surf’s a boat with a wave that only has 5ft of push. But, what if you are a 6’ rider weighing 200lbs with slightly better balance that is starting some intermediate tricks like a 360’s? For beginning riders this tradeoff might be ok but as you start to advance, custom boards should definitely be on your agenda. I will take it a step further and wager, most pro-riders do not ride their mass-produced board, more than likely they have a version made to their specific specifications.
We are publishing a series of blogs to provide insight into the custom Wakesurf board building process, detailing the different phases of design and manufacturing of a custom-made board. By the end of the series, you will discover that custom designed boards are within reach of almost any rider and allows you to express your creativity out on the water. The first article in the series will cover the process of getting the Wakesurf Style graphics ready for board creation.
The graphics
For context, this board is being designed for one of the Wakesurf Style team members. Their profile is as follows: 5’ 10” ~220lbs – the rider is intermediate level, free surfs with ease and expanding skills, exploring 180s, 360s and airs so more pop off the board is desired. The board will be a Surf style board.
The initial concept for the board graphics were to incorporate the Wakesurf Style logo and one of our apparel graphic designs into the board. In the initial design discussion with Jonathan, we decided that the Wakesurf Style logo would go on the bottom of the board and that we wanted to incorporate some blue colors into the board as it is the rider’s favorite color. For the deck we wanted to incorporate our PNW Wakesurf Team graphic:
We sent Blusurf the graphics as Adobe Illustrator files. Below you can see examples of the initial graphics that were provided.
![]()

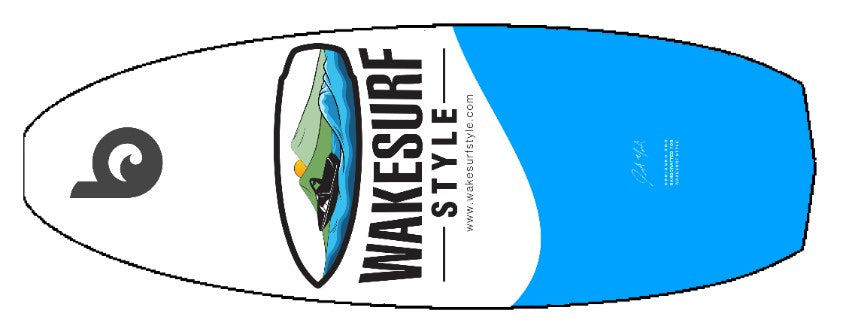
Jonathan came back with a great design using the Wakesurf Style logo on the bottom of the board and incorporating a blue wave which we really liked. On the top of the deck, with our t-shirt graphic and he included a blue line down the board, this serves the minor purpose of helping us center the traction pads when replacing. We went back and forth a few times on the line thickness and minor spacing changes on the top deck, finally settling on a layout. On the bottom graphic, we made some small text changes and worked on tweaks to better center our logo graphic with the text.
Once that was done, Blusurf worked with us on the rider requirements for the board (more on this topic in the next article) to figure out the basic shape of the board (think normal or more blunt nose, shape of the rear of the board, etc). Also, importantly we needed to measure the riders normal foot spacing to determine where the front and rear footpads would sit on the board to finalize the position of the PNW Wakesurf Team graphic. The foot spacing is important not just for determining our graphic placement but also factors into the shape of the board (which again we will cover in the next article). The final board design graphics are shown below:

And here is a closeup of the board bottom:

And lastly a photo of the graphic design being modified at Blusurf using Photoshop:

The next step in the process is the board design and the cut out of the initial board shape. We cover this in Part II of the blog which you can find here. In the meantime visit the Wakesurf Style store where you can join the PNW Wakesurf Team by grabbing one of those t-shirts (women’s style / men’s style) or other apparel (use coupon code 10OFFBLU1 to get 10% off your first Wakesurf Style purchase for a limited time). And be sure to visit the Blusurf website if you want to learn more about their history and products.
Designing the Wakesurf Style custom board:
- Part I - The Graphics
- Part II – Shaping the Board
- Part III – Fin box, graphics, lamination and finishing
If you have any questions, feel free to email us at info@wakesurfstyle.com